Educational field reference. Not medical advice; collaborate with your prosthetist/clinician for individual requirements.
1) Principles That Matter
- Center of Gravity (CoG): Keep load mass close to the spine and near mid-thoracic level to reduce trunk lean and conserve energy.
- Moment Arms: The farther weight is from your back plate, the more torque on hips and sockets; compress soft items to minimize lever effect.
- Symmetry vs. Stability: Perfect symmetry isn’t required—predictable sway is. Prioritize a repeatable load path over chasing micro-balance every step.
2) Pack Architecture & Fit
- Frame: Light internal frame or stays to transfer load to hips; avoid floppy sacks for 72-hr loads.
- Harness: S-curved shoulder straps, adjustable sternum strap, and contoured hip belt. For higher sockets, choose belts that sit slightly higher to avoid brim contact.
- Back panel: Flat and close; trampoline panels can push CoG rearward—fine for daypacks, sub-optimal for 72-hr loads.
3) Socket Comfort & Interface Biology
Load carriage alters pelvic tilt and trunk lean, changing pressures at the socket interface. Skin and soft tissues around the brim are vulnerable to shear and ischemic hot spots.
- Reduce shear: Minimize side-to-side slosh with compression sacks; keep heavy items centered.
- Pressure distribution: Hip belt snug but not crushing; seat it on bony landmarks that tolerate load.
- Thermal management: Breathable liners and moisture control prevent maceration that weakens skin barrier.
4) Load Map (72-Hour Baseline)
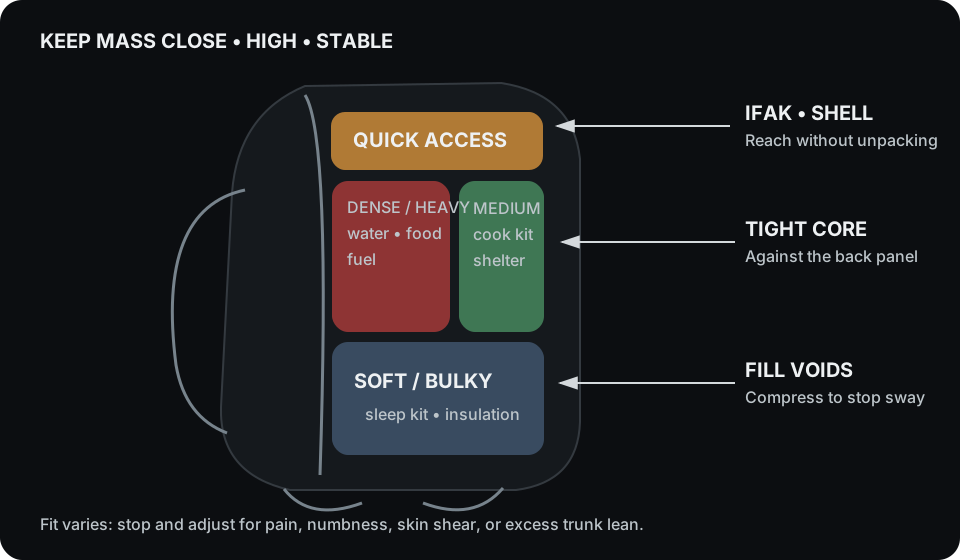
- Heaviest dense items (water, stove fuel, food): Against the back panel, between shoulder blades.
- Medium density (cook kit, shelter): Directly around the core block to keep a tight mass.
- Soft/bulky (sleep kit, puffy): Fill voids to stop shift, then compress hard.
- High-access (IFAK, rain shell, gloves): Top lid or front pocket; do not let these become tail-heavy.
Rule of thumb: target total pack mass ≈ 10–15% body mass for mixed terrain; adjust for fitness, terrain grade, and prosthetic energy cost.
5) Compression Strategy (No Sway = Less Fatigue)
- Build a rigid core block with dense items in a vertical column.
- Use two compression layers: internal (sacks) then external (side straps).
- Finish with a top strap to pull mass toward the frame and reduce “pack flop.”
- Walk 50–100 m and re-tighten as contents settle.
6) Gait & Energy: Why Balance Saves Calories
Every lateral sway adds corrective work at the hip and trunk. For amputees, prosthetic side stance time and push-off mechanics can increase metabolic cost. A close CoG limits corrective torque, reducing oxygen demand and socket micro-motion.
7) Field Drills (15–20 minutes)
- Static Balance Check (2 min): Don pack, close eyes, count natural sway. Repack to reduce sway count by half.
- 50-Step Test (5 min): Mark a 25 m lane, walk out/back. If straps need retightening more than once, increase internal compression.
- Incline Control (8–10 min): On a mild slope, note trunk lean up vs. down. Move a 0.5–1 kg item higher/lower and repeat; choose the configuration that requires less lean.
8) Suggested 72-Hr Checklist (Lean)
- Shelter: 8–12 stakes, tarp/bivy, cordage
- Sleep: pad + insulated layer; compress bag/quilt
- Water: 2–3 L capacity + filter/tabs
- Food: ~2,400–3,200 kcal/day, high-carb mix for cold
- Heat: stove + fuel, ferro rod + lighter
- Med: IFAK with hemorrhage control, meds you’re prescribed
- Tools: headlamp, knife, tape, small repair kit
- Clothing: wicking base, warm mid, weather shell, spare socks
9) Red Flags & Adjustments
- Socket pain or skin shear: Stop, offload, inspect; repack to center mass, add soft buffer to stop sway.
- Numbness or tingling: Loosen hip belt slightly and raise/lower its position; consider shifting 0.5–1 kg upward.
- Excess trunk lean: Move dense items higher and closer to the frame; shorten load-lifters slightly.
Compare pack systems
Commercial product examples and paid retailer links are kept separate from this adaptive-load guide.
Researched Pack-System Examples
Paid-link disclosure: If you purchase through an Amazon link below, I may earn a commission at no added cost to you.
-
Osprey Exos 48 BackpackView on Amazon (paid link)
A lightweight framed-pack example. Torso length, hip-belt position, socket clearance, and comfortable load are personal—verify fit before use.
-
Sea to Summit eVac Compression Dry Bag, 13LView on Amazon (paid link)
Compresses soft insulation into a more stable pack core. Its roll-top closure is not intended for prolonged submersion.
-
Black Diamond Spot 400-R HeadlampView on Amazon (paid link)
A rechargeable headlamp with red-light and lockout modes. Carry a compatible charging plan and a separate backup light.
These are examples, not universal prescriptions. Work with your prosthetist or clinician when pack fit affects socket comfort, gait, or skin integrity.